How to Read a Knitting Pattern for Beginners

How to Read a Knitting Pattern for Beginners
Learning how to read a knitting pattern can feel confusing when you’re just starting out. A pattern may contain abbreviations, numbers, stitch counts, gauge measurements, charts, parentheses, brackets, and instructions that seem difficult to understand at first. However, most knitting patterns follow a logical structure, and once you understand what each section means, reading them becomes much easier.
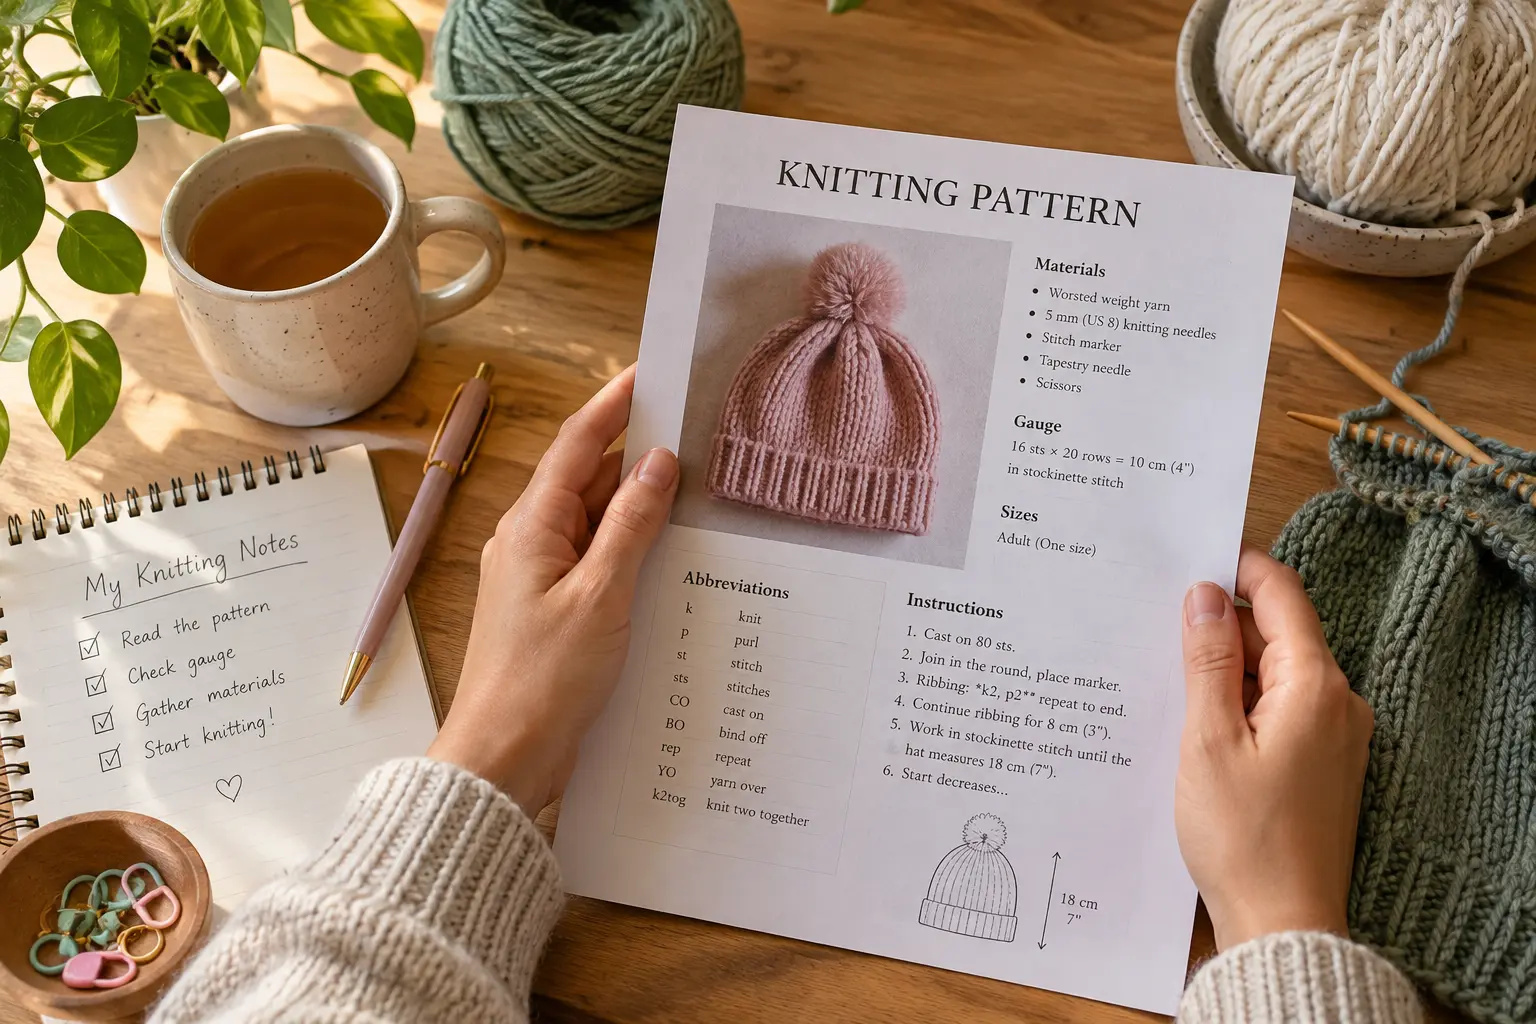
A knitting pattern is essentially a set of instructions that tells you how to turn yarn into a finished project. It provides information about the materials you need, the size of the finished item, the recommended gauge, the stitches and techniques involved, and the order in which everything should be worked. Instead of trying to understand the entire pattern at once, it is much easier to break it into smaller sections and understand what each part is telling you.
Whether you’re preparing to knit your first scarf, hat, baby blanket, sweater, or another project, understanding pattern terminology will make the process much less intimidating. This guide explains the main parts of a knitting pattern, common abbreviations, stitch counts, gauge, charts, repeats, sizing, and the best way to work through instructions step by step.
What Is a Knitting Pattern?
A knitting pattern is a written set of instructions used to create a specific knitted item. Depending on the project, a pattern can be very short and simple or several pages long with detailed instructions for shaping, multiple sizes, stitch patterns, and finishing.
A simple scarf pattern might only tell you which yarn to use, which needles to choose, how many stitches to cast on, and which rows to repeat. A sweater pattern, on the other hand, may contain several sections covering measurements, gauge, different sizes, shaping, sleeves, neckline construction, finishing, and assembly.
The most important thing to remember is that a knitting pattern is not something you need to understand all at once. Read the information from the beginning, identify the parts that apply to your project, and then follow the instructions one row or round at a time.
The Main Parts of a Knitting Pattern
Most knitting patterns contain several standard sections. The exact order and terminology can vary between designers, but the information is usually similar.
| Pattern Section | What It Tells You |
|---|---|
| Skill Level | How difficult the project is expected to be |
| Finished Measurements | The approximate size of the completed project |
| Materials | Yarn, needles, and additional supplies |
| Gauge | The expected number of stitches and rows |
| Abbreviations | Short forms used throughout the instructions |
| Notes | Important information about construction or techniques |
| Instructions | The actual steps for making the project |
| Finishing | How to assemble and complete the project |
Before picking up your needles, take a few minutes to look through these sections. This can help you identify anything unfamiliar before you reach it in the instructions.
Understanding the Materials Section
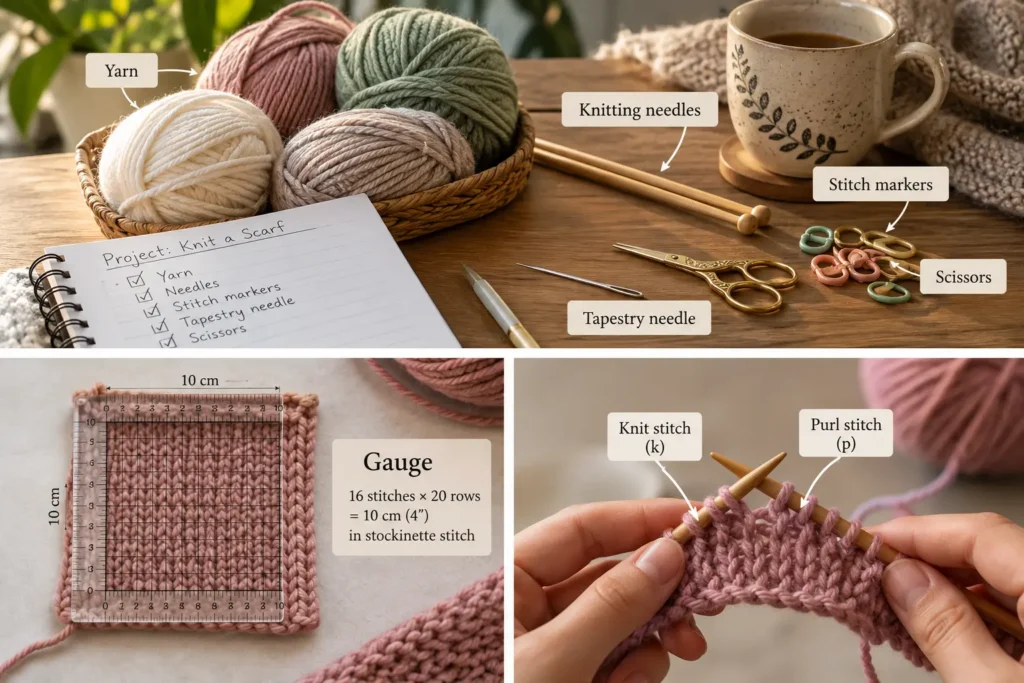
The materials section tells you what you need before starting the project. It normally includes the yarn type and quantity, knitting needle size, and any additional tools required.
For example, a pattern might recommend a specific yarn weight and a particular needle size. It may also list a tapestry needle, stitch markers, scissors, cable needle, buttons, or other finishing supplies.
Don’t assume that two yarns with similar colors will behave the same way. Yarn weight, fiber content, construction, and individual tension can all affect the finished fabric.
Understanding Yarn Weight
Yarn weight describes the thickness of the yarn rather than how much the yarn weighs in grams.
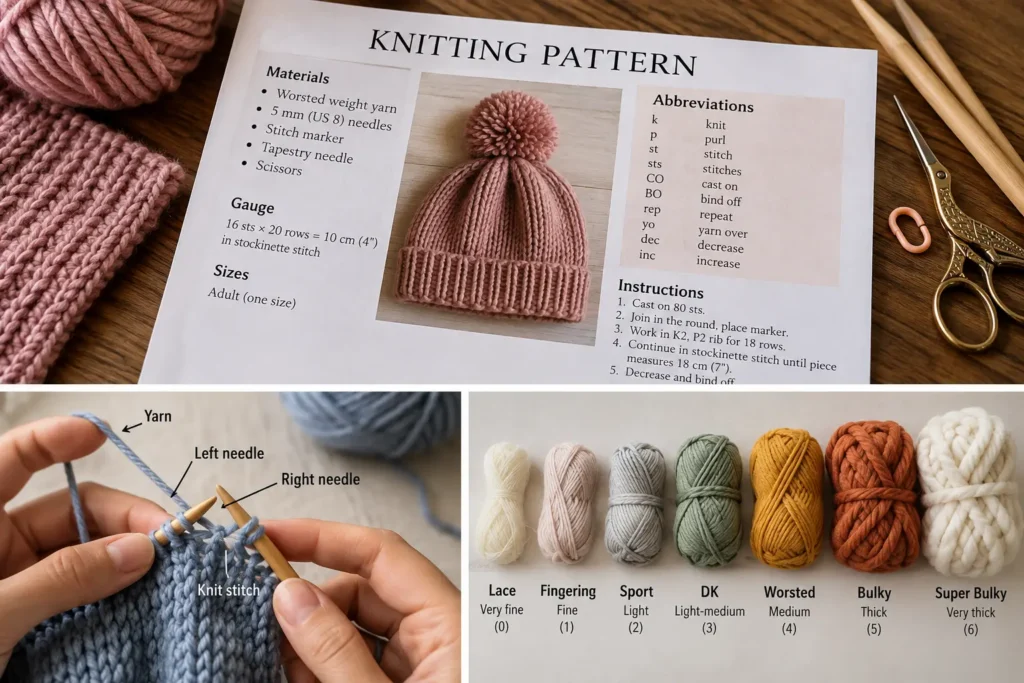
Common yarn weight categories include:
| Yarn Weight | Common Description | Typical Projects |
|---|---|---|
| Lace | Very fine | Shawls, delicate accessories |
| Fingering | Fine | Socks, lightweight garments |
| Sport | Light | Baby clothes, lightweight sweaters |
| DK | Light-medium | Sweaters, hats, scarves |
| Worsted | Medium | Hats, sweaters, blankets |
| Bulky | Thick | Warm hats, blankets, quick projects |
| Super Bulky | Very thick | Chunky blankets, winter accessories |
Always check the actual pattern requirements rather than choosing yarn only because it falls into the same general category.
Understanding Yardage and Yarn Quantity
A pattern may tell you how many grams, balls, skeins, yards, or meters of yarn you need. These measurements are important because two balls of yarn can have different lengths even if they have the same weight.
When substituting yarn, compare the recommended yardage as well as the yarn weight. This gives you a better idea of whether you have enough yarn to complete the project.
Understanding Finished Measurements
Finished measurements describe the approximate dimensions of the completed project.
For a scarf, this might include the finished length and width. For a sweater, you may see measurements for chest circumference, body length, sleeve length, and other areas.
Finished measurements are particularly important when making clothing or fitted accessories because choosing the wrong size can result in a project that doesn’t fit as expected.
Finished Measurements vs. Body Measurements
These two terms are not necessarily the same.
Body measurements describe the person who will wear the item, while finished measurements describe the actual dimensions of the knitted item after completion.
For example:
| Measurement Type | Meaning |
|---|---|
| Body measurement | The measurement of the wearer |
| Finished measurement | The measurement of the completed knitted item |
| Ease | The difference between body and finished measurements |
When choosing a size, always read the designer’s instructions carefully instead of automatically choosing the size that matches your usual clothing size.
Understanding Knitting Gauge
Gauge is one of the most important parts of a knitting pattern, especially when the finished size matters.
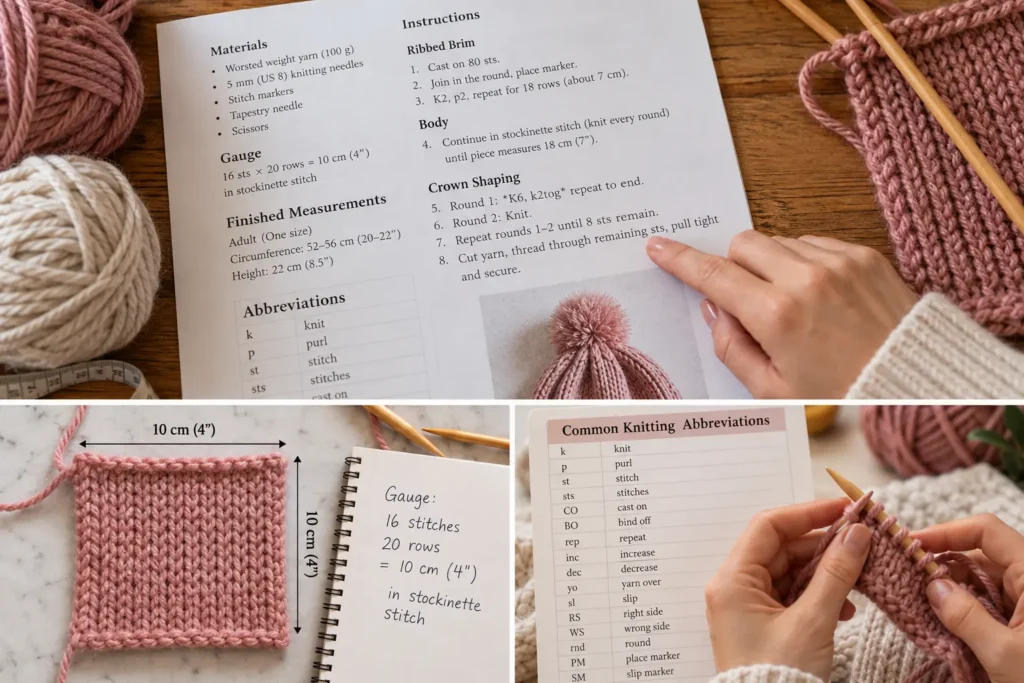
Gauge tells you how many stitches and rows should fit into a particular measurement, commonly 4 inches or 10 centimeters. For example, a pattern might specify a certain number of stitches and rows over a 4-inch square.
Your knitting tension may be different from the designer’s tension. If your stitches are larger or smaller, the final project can also become larger or smaller.
Why Gauge Matters
Imagine that a sweater pattern is designed around a specific number of stitches per 4 inches. If your stitches are significantly larger, you may end up with a garment that is wider than intended. If your stitches are smaller, the finished garment may be too small.
This is why gauge matters much more for fitted projects than for some simple accessories.
How to Make a Gauge Swatch
A gauge swatch is a small sample knitted using the yarn, needles, and stitch pattern recommended by the pattern.
To check your gauge:
- Use the recommended yarn and needle size.
- Knit a swatch larger than the measurement you need to check.
- Wash and dry the swatch if the pattern recommends doing so.
- Measure the stitches across the center area.
- Count the rows within the specified measurement.
- Compare your results with the pattern’s gauge.
If your gauge is too tight, you may need larger needles. If your gauge is too loose, you may need smaller needles.
Knitting Pattern Abbreviations
Knitting patterns use abbreviations because repeating complete words throughout a pattern would make the instructions much longer.
Here are some common abbreviations beginners should recognize:
| Abbreviation | Meaning |
|---|---|
| k | Knit |
| p | Purl |
| st | Stitch |
| sts | Stitches |
| CO | Cast on |
| BO | Bind off |
| rep | Repeat |
| RS | Right side |
| WS | Wrong side |
| rnd | Round |
| beg | Beginning |
| inc | Increase |
| dec | Decrease |
| rem | Remain or remaining |
| sl | Slip |
| yo | Yarn over |
| PM | Place marker |
| SM | Slip marker |
These abbreviations are common, but terminology can vary between designers. Always check the abbreviation key included with the pattern you’re using.
How to Read a Knitting Pattern Instruction
Once you understand the abbreviations, individual instructions become much easier to interpret.
For example, you might see an instruction such as:
K2, p2 across the row.
This means you knit two stitches, purl two stitches, and continue following that sequence across the row.
You may also see something like:
K1, p1, repeat from * across.
This means you knit one stitch, purl one stitch, and then repeat that sequence across the row.
The important thing is to identify what the pattern wants you to repeat and where the repeat begins and ends.
Understanding Repeats in Knitting Patterns
Repeats are used constantly in knitting patterns because many stitch designs consist of a repeating sequence.
A pattern might say:
Repeat rows 1–4 until the piece measures 8 inches.
In this case, you don’t stop after completing row 4. You return to row 1 and work through rows 1–4 again until the required measurement is reached.
Another common format is:
Repeat from * to * across the row.
The asterisks identify the section that needs to be repeated.
Common Repeat Instructions
| Pattern Wording | What It Means |
|---|---|
| Repeat from * to * | Repeat the section between the symbols |
| Repeat across | Continue the sequence across the row |
| Repeat for 4 rows | Work the specified instructions four times |
| Repeat rows 1–4 | Return to row 1 after completing row 4 |
| Repeat until piece measures… | Continue until the specified measurement is reached |
Understanding these phrases is one of the most useful skills when learning how to read a knitting pattern.
Understanding Stitch Counts
Stitch counts are checkpoints that help you make sure your work is progressing correctly.
A pattern might say:
You should have 48 stitches.
This means you should count your stitches and confirm that you have the expected number before continuing.
If you have fewer or more stitches than the pattern specifies, it may mean that a stitch was accidentally added, dropped, increased, or decreased.
Why Stitch Counts Are Important
Checking stitch counts regularly can save you from discovering a mistake several rows later. The sooner you notice a problem, the easier it usually is to find where something went wrong.
For complicated projects, you may want to use stitch markers to separate sections and make counting easier.
How to Read a Knitting Chart
Some knitting patterns use charts instead of written instructions. Charts are especially common for cables, colorwork, lace, and textured stitch patterns.
A knitting chart usually consists of a grid of squares. Each square represents a stitch, while different symbols represent different knitting techniques.
Before starting a chart, always read the chart key. The key explains what each symbol means.
Reading Direction Matters
The direction in which you read a chart depends on how the pattern is constructed.
For many flat knitting patterns, right-side rows are commonly read from right to left, while wrong-side rows may be read from left to right. However, this is not universal, so always follow the instructions provided with the specific pattern.
For knitting in the round, charts are commonly worked from right to left on each round.
Never assume the reading direction without checking the pattern’s instructions or chart notes.
Understanding Chart Symbols
Chart symbols can represent many different actions.
For example, a chart may use different symbols for:
- Knit stitches
- Purl stitches
- Yarn overs
- Decreases
- Increases
- Slipped stitches
- Cable crossings
The symbol itself is not enough. The chart key is essential because designers may use different symbols for the same technique.
How to Read Patterns With Multiple Sizes
Many knitting patterns, especially garment patterns, are written for several sizes at once.
Instead of providing a separate pattern for every size, the designer may put multiple numbers inside the same instructions.
For example:
Cast on 80 (88, 96, 104) stitches.
Each number corresponds to a different size.
Before starting, identify which size you are making and mark the numbers that apply to that size. This is one of the easiest ways to avoid accidentally switching between sizes while following the pattern.
Create Your Own Size Reference
For a multi-size pattern, write down your selected size and the corresponding numbers before starting.
| Information | Your Size |
|---|---|
| Cast-on stitches | ___ |
| Finished width | ___ |
| Finished length | ___ |
| Gauge | ___ |
| Needle size | ___ |
| Sleeve or shaping measurements | ___ |
This simple preparation can make a long pattern much easier to follow.
How to Follow a Knitting Pattern Step by Step
Once you’ve reviewed the pattern, you can start working through it systematically.
1. Read the Entire Pattern First
Don’t immediately start knitting after reading the first instruction. Read the entire pattern once so you understand how the project is constructed.
Look for unfamiliar abbreviations, techniques, charts, shaping instructions, and finishing steps.
2. Gather Your Materials
Prepare your yarn, needles, stitch markers, tapestry needle, scissors, and any other supplies listed in the pattern.
Having everything ready prevents interruptions once you begin.
3. Check Your Gauge
If the pattern provides a gauge, make a swatch before starting the main project, especially when size is important.
4. Identify Your Size
If multiple sizes are included, mark the numbers and instructions that correspond to your chosen size.
5. Learn Any Unfamiliar Techniques
If the pattern uses a technique you’ve never tried, learn how it works before reaching that section of the project.
6. Start With the First Instruction
Work through the pattern in order rather than jumping ahead.
7. Track Your Progress
Use a row counter, pencil, sticky note, or another simple method to keep track of where you are.
8. Check Your Stitch Count
When the pattern provides a stitch count, stop and check your stitches before continuing.
Common Mistakes Beginners Make When Reading Knitting Patterns
Even when a pattern seems simple, beginners can make mistakes by overlooking small details.
Starting Without Reading the Pattern
One common mistake is beginning immediately after reading only the first few lines. A later section may require a particular technique, needle size, or construction method that would have been useful to know beforehand.
Reading the complete pattern first gives you a better understanding of what you’re about to make and helps you prepare for anything unfamiliar.
Ignoring the Gauge
Skipping gauge can create major sizing problems, particularly for sweaters, hats, and other fitted projects. Even if you are using the exact yarn recommended by the designer, your personal knitting tension may be different.
Losing Track of Repeats
When a pattern contains several repeated rows or stitch sequences, it can be easy to lose your place. Marking each completed repeat can make the process much easier.
Misreading Multiple Sizes
Patterns with several sizes can be confusing because several numbers may appear in the same sentence. Always identify your size before beginning and consistently follow the corresponding numbers.
Assuming Every Abbreviation Means the Same Thing
Although many abbreviations are widely used, designers may have their own terminology. Check the pattern’s abbreviation section rather than relying entirely on assumptions.
Tips for Making Knitting Patterns Easier to Follow
Once you understand the basic structure, a few simple habits can make your knitting experience much smoother.
Highlight Important Information
If you’re working from a printed pattern, highlight the size you’re making and important measurements. This reduces the chance of accidentally following instructions intended for another size.
Keep Track of Rows
For patterns with many repeated rows, use a row counter or mark each completed row. This is particularly helpful when you need to put your project down and return to it later.
Use Stitch Markers
Stitch markers can divide a project into manageable sections. They can be especially useful for circular knitting, shaping, lace patterns, and projects with repeated sections.
Don’t Rush Unfamiliar Instructions
If an instruction doesn’t make sense, stop and read it again before continuing. Trying to guess what the designer means can create more problems later.
Check Your Work Regularly
You don’t need to count every stitch after every row, but regular checks can help you catch mistakes early.
Written Patterns vs. Knitting Charts
Both written instructions and charts can describe the same stitch pattern, but they present information differently.
| Feature | Written Pattern | Knitting Chart |
|---|---|---|
| Format | Words and abbreviations | Symbols in a grid |
| Best for | Step-by-step instructions | Visual stitch patterns |
| Useful for | Beginners and construction | Lace, cables, colorwork |
| Repeats | Written instructions | Repeated chart sections |
| Learning curve | Usually easier initially | Can take practice |
Neither format is inherently better. Many experienced knitters become comfortable using both and choose whichever format makes a particular project easier to understand.
A Simple Example of Reading a Knitting Instruction
Let’s look at a simplified example:
Row 1: K2, p2, repeat from * across.
The first thing to understand is that the instruction contains a sequence of stitches rather than one single action.
You would knit two stitches, then purl two stitches, and continue repeating that sequence across the row. The exact number of stitches at the end depends on the total number of stitches you started with.
If the pattern gives you a final stitch count, use it as a checkpoint to make sure you haven’t accidentally added or dropped stitches.
What to Do When a Knitting Pattern Seems Confusing
If you’re following a pattern and suddenly don’t understand an instruction, don’t immediately undo your work.
First, go back and read the previous instructions. Check the abbreviation key, stitch count, and any notes included by the designer. Sometimes an instruction only makes sense when you understand what happened in the previous row.
If the problem involves a chart, look at the chart key and confirm which row or round you’re currently working. If the project includes multiple sizes, also make sure you’re following the correct number for your selected size.
Taking a few minutes to identify exactly where the confusion started is usually much more helpful than continuing while unsure.
Frequently Asked Questions
How do I read a knitting pattern for the first time?
Start by reading the entire pattern before knitting. Identify the materials, finished measurements, gauge, abbreviations, and required techniques. Then work through the instructions one row or round at a time while checking your stitch counts.
What should I look at first in a knitting pattern?
Start with the finished measurements, materials, yarn requirements, needle size, gauge, and skill level. If the pattern includes multiple sizes, identify your size before beginning.
What does K2 P2 mean in knitting?
K2 means knit two stitches, while P2 means purl two stitches. If the instruction says to repeat K2, P2, continue that sequence according to the pattern instructions.
What does “repeat from *” mean in knitting?
It means you should repeat the instructions identified by the asterisk. The pattern normally tells you where the repeat ends and how many times or how far you should continue repeating it.
What does “rep” mean in a knitting pattern?
“Rep” is an abbreviation for “repeat.” It tells you to repeat a stitch, sequence, row, or group of instructions.
What does gauge mean in knitting?
Gauge describes the number of stitches and rows produced within a specific measurement. Matching the recommended gauge can help you achieve the intended finished size.
Do I need to make a gauge swatch?
For projects where size is important, especially fitted garments, making a gauge swatch is strongly recommended. For some simple projects, exact gauge may be less critical.
Why are there so many numbers in knitting patterns?
Multiple numbers are often used to provide instructions for different sizes. Each number corresponds to a particular size, so it’s important to identify your size before starting.
Are knitting charts difficult for beginners?
Charts can seem confusing at first because they use symbols instead of written instructions. Once you understand the chart key and reading direction, they can become a very efficient way to follow stitch patterns.
Conclusion
Learning how to read a knitting pattern is one of the most useful skills you can develop as a knitter. At first, abbreviations, stitch counts, gauge information, charts, and repeated instructions can seem like a completely different language. With practice, however, these elements become familiar and much easier to understand.
The key is to avoid trying to decode everything at once. Start by understanding the materials and finished measurements, identify your gauge and size, learn the abbreviations, and then work through the instructions one row or round at a time. Keep track of your progress and use stitch counts as checkpoints along the way.
As you become more comfortable reading simple patterns, you’ll be able to move on to more detailed projects involving shaping, cables, colorwork, lace, garments, and other advanced techniques.
If you’re ready to practice with a simple project, explore our 7 Easy Knitting Patterns for Beginners for beginner-friendly ideas, or visit our Knitting Patterns page to discover more projects.